Basic Authorization
In Basic Authorization, roles are used to grant access to the Application.
Roles are created and assigned to Users. Application permit user access to specific functionality based on the roles that are assigned to User. For example, Timesheet Application can have 2 roles; Manager and Employee. Employee will be able to fill and submit timesheet while the Manager will be able to approve the timesheet submitted.
The checking of role will be based on the roles listed in the active_tenant claim in Access Token.
Typical flow for basic authorization is as follows:
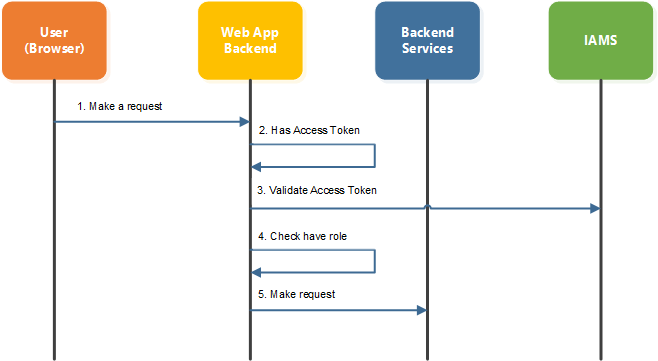
-
User make a request to Web App Backend.
-
Web App Backend check whether user has
Access Tokenin cookies. IfAccess Tokenis not present, user will be denied access and redirect to Keycloak for authentication. -
If
Access Tokenis present, Web App Backend will then need to validate theAccess Tokento ensure it is valid. To check for validity of theAccess Token, Web App Backend can use the Online or Offline Validation. See Online Validation and Offline Validation for more information onAccess TokenValidation. -
Once determine that the
access tokenis valid, Web App Backend will then retrieve the roles that are assigned to user from theAccess Token. Based on the roles, Web App Backend will determine whether user has the rights to perform the request. If user doesn’t have the required role, he will be directed to error page. -
If has the correct role, Web App Backend can then direct the request to the Backend Services.
Retrieve Roles from Access Token
To access the roles granted to user from the Access Token, you will need to perform the followings:
- Split Access Token into Sections; Header, Payload, and Signature
- Decode the payload of Access Token to JSON string
- Retrieve the roles from the active_tenant claim in the JSON string.
Please refer to Split Access Token into Section and Check Issue Date and Expiry Date on how to split Access Token and decode the payload into JSON string.
After decoded the access token, you should get a JSON string with structure similar to the followings:
{
  "exp" : 1721289932,
  "iat" : 1721289632,
  "auth_time" : 1721289347,
  "jti" : "a0b2a1fc-cdd8-43a4-9e95-627defac350b",
  "iss" : "http://192.168.6.44:8080/realms/AOH",
  "aud" : [ "realm-management", "account" ],
  "sub" : "b25aa224-21b2-40d7-a735-3d5f10f99146",
  "typ" : "Bearer",
  "azp" : "web-app",
  "sid" : "9774505b-835e-4729-b1d1-f11920c9284a",
  "acr" : "0",
  "allowed-origins" : [ "http://localhost:3000" ],
…
…

"preferred_username" : "tbs",
  "given_name" : "T",
  "active_tenant" : {
    "tenant_id" : "8ce3c8f2-98fa-4d06-b51c-1724c86e53aa",
    "tenant_name" : "test 2",
    "roles" : [ "tenant-admin", "Manager", "Content Creator" ]
  },
  "family_name" : "BS",
  "email" : "tbs@test.com"
}
To have the active_tenant claim available in the Access Token, Select Active Tenant required action and
Active Tenant Mapper need to be configured in the Realm.
Please refer to Enable Active Tenant Required Action
and Configure Active Tenant Mapper
on how to configure the Select Active Tenant required action and Active Tenant Mapper.