Source Control
This section explains how we manage our source code, why we do it in this way, and why you have to do it this way too.
Git
We use Git as our VCS (version control system) because it is highly mature, widely supported, has well established best-practices, and has many tools that support it.
How this ties to Developer Operations
Since we want our application to be cloud native, we need to have a good degree of infrastructure automation. We'll have to be able to easily scale up or down services by declaratively describing their deployment configurations, and we'll want to have preview servers automatically deployed when we check in our code to faciliate faster development cycles.
To achieve these things, our applications are containerized and orchestrated by Kubernetes, and the container images are built automatically by our CI. These images are created whenever a commit occurs on a Git branch that is tied to an environment (e.g. when a merge request is successfully merged from a feature branch to the release branch, the new code from the release branch would then be built by the CI into an image, and this image will be uploaded to a container registry, and ultimately deployed by Kubernetes).
In order for these systems to be run effectively, we adopt the principles of GitOps, this is necessary for us to develop and deploy our system in a reliable, structured way.
What is Git Ops?
GitOps is a practice that makes Git the single source of truth for our infrastructure definitions. This means that we
will be able to make changes to the system's deployment 'simply' by looking at the state of the Git repository. By
tying the configuration of the system infrastructure and deployment to source code, we also gain the ability to version
the infrastructure since they can be tied to individual Git commits.
Read more about GitOps here.
Branching Strategy
We are essentially using a variations of Git Flow as our branching strategy. This is required because our deployment environments are tied to branches in your Git repository. These branches that get deployed can be seen as 'deployment' branches.
For each environment that you want to have automatically deployed, you need a branch. When developers need to make changes to that branch, they check out a new branch using that as the base. They then make changes to their 'personal' feature branch, and when they are done, they make a pull request to merge it back to the base branch, which then gets triggered to be deployed.
For example, someone found a typo in the web develop branch (this branch deploys to a preview server for us to
view changes made to the web server) - for a change to be made, a developer must use the develop branch as the base
and checkout a new branch with a new name (e.g. fix/ambulance-chart-typo). They then make the changes to fix this
typographical error, and open a pull request to contribute this change back to the develop branch. This pull
request must be reviewed by another developer to ensure it adheres to the projects guidelines and as a primary check to
ensure it does not sabotage the system (code formatting and linting should be done automatically by pre-commit hooks).
Git Flow is a popular and well documented branching strategy, read more about it here.
We have 4 categories of branches:
-
Production
main
The branch called
mainis reserved specifically for the most up to date code. This might map directly to a production environment. -
Release
release/*
Branches starting with "release" are reserved for code that is being prepared for release
-
Development
develop
The branch called
developis reserved for the latest development code. This will be the base for all feature branch checkouts. -
Feature
feat|fix|release.../...
Developers are to work on branches with a naming scheme that starts with
feat,fix,release,refactor,choreorstyle, followed by a slash, then a kebab case description. This is to help us quickly identify the purpose of each branch. Example branch name -fix/ambulance-chart-typo
Changesets
We use changesets to managing versioning and changelogs for our repositories.
Code Merging (via Pull/Merge requests)
The expected workflow for merging code is as follows:
You've finished fixing the typographical errors in your fix/ambulance-chart-typo branch and wish to merge it back
to the develop branch - you've run changeset to record your changes and committed your code following our standards.
- Create a pull request
- Inform the team (if configured appropriately on GitHub, CODEOWNERS and other relevant members might be notified automatically via GitHub )
- Discuss and make changes if required
- Once approved, and all checks passs, use Squash & Merge to merge in the commits
- Delete the branch
Conventional Commits
Conventional commits is a specification for adding human and machine readable meaning to commit messages.
The specification is well documented, read more about conventional commits here.
The actual rule we use for allowed types (the prefix of the commit message) can be found in the web-base's commitlint config file.
Summary
The Conventional Commits specification is a lightweight convention on top of commit messages. It provides an easy set of rules for creating an explicit commit history; which makes it easier to write automated tools on top of. This convention dovetails with SemVer, by describing the features, fixes, and breaking changes made in commit messages.
The commit message should be structured as follows:
<type>[optional scope]: <description>

[optional body]

[optional footer(s)]
Why conventional commits?
Following conventional commits allows many tools to parse and make sense of commits since they follow an agreed upon convention. It also standardizes them in a format that lets the reader make sense of the commit. On our web server, we use husky to apply a pre-commit check to enforce that developers commit with messages that follows conventional commits. We can then use tools to generate release notes based on these commits - but the quality of these notes will directly be related to the quality of the commit messages and pull requests, so please take this practice seriously!
Enforcement
GitHub Rulesets
GitHub rulesets for each branch is configured to restrict pushes to specific branches without
a pull request with reviewers, as well as add branch naming patterns to follow, block force pushes etc. Refer to the
Web Base's rule settings for reference - you can export and
reuse these rules in your new repository for convenience.
Husky
Husky is a tool we use to control the quality of code and enforce commit standards. Before each commit, linting and formatting for code should be run, and commit messages are checked against commit lint's rules.
Signing Commits
To sign commits that are valid under GitHub's rules - you must use a GPG Keypair. Signing commits allows us to verify that commits are made by the user that's committing them.
Ideally, all branches should be protected to require commits to be signed. This can be done by configuring GitHub's branch protection rules to ensure commits are only allowed when they have been verified with a GPG signature. The following section explains how you can set your computer up with a GPG keypair to sign your git commits.
1. Generate a GPG Keypair
To generate a new GPG key on the machine:
gpg --full-generate-key
1for(1) RSA and RSA (default)when prompted on what kind of key you want.4096when prompted on what keysize you want.0when prompted how long the key should be valid so that it does not expire (unless you wish to commit to a different policy).yto confirm that the key does not expire if you picked0.<your name>when asked for your name. This does not need to match the commit name.<email address>when asked for your email, this must match the commit email address.<comment>(optional) some comments to tag onto this key.Ofor (O)kay when you're done.- A dialogue box will appear - key in your passphrase for the key - you MUST remember this passphrase and use it every time to sign a commit. You will be asked to key the passphrase in again to confirm.
See this reference for more information.
2. Set up the GPG public key
2.1. List your existing GPG keys
To list existing GPG keys on the machine:
gpg --list-keys --keyid-format=long
gpg --list-secret-keys --keyid-format=long
GPG key ID is located after sec rsa4096/
See this reference for more information.
2.2. Print the GPG public key
Print the GPG public key in ASCII armor format:
gpg --armor --export <key-ID>
See this reference for more information.
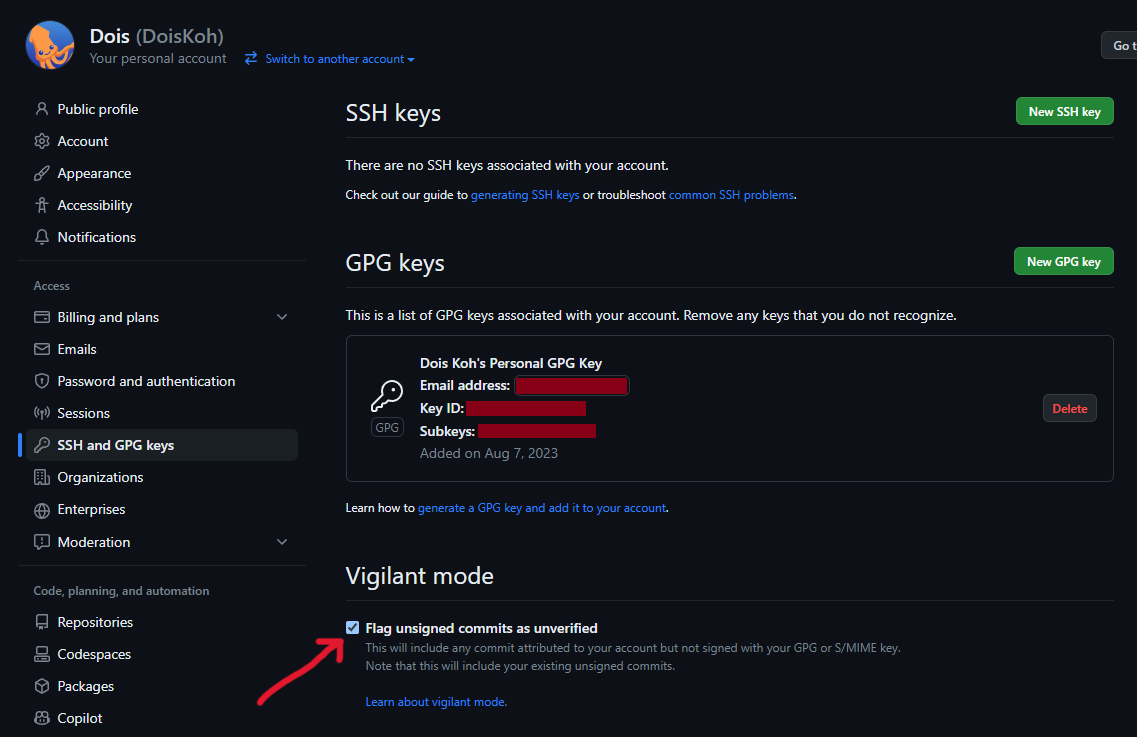
2.3. Add the GPG public key to GitHub
Copy the entire output from 2.1 into your GitHub account's settings > keys
Select New GPG key and paste the output there.
Also, it is highly recommended that you set your account to Vigilant mode to mark any unsigned commits as unverified.
See this reference for more information.
3. Set up the GPG private key
Edit the .gitconfig for global configuration. On Windows machines, it should be at %USERPROFILE%/.gitconfig.
Or edit the .git/config for each repository's configuration.
[user]
    email = <commit email>
    signingkey = <key-ID>
[commit]
    gpgsign = true
Alternatively, you can use the following commands to edit your git config from the terminal.
 git config user.email "<commit email>"
 git config user.signingkey "<key-ID>"
 git config commit.gpgsign true
You can add the --global flag to modify the settings globally (for any/all repositories in your machine).
Repository settings will supersede global settings.
 git config --global user.email "<commit email>"
 git config --global user.signingkey "<key-ID>"
 git config --global commit.gpgsign true
After that, you will be prompted for a passphrase every time you commit.
See this reference for more information.
List your existing GPG keys
To list existing GPG keys on the machine:
gpg --list-keys --keyid-format=long
gpg --list-secret-keys --keyid-format=long
GPG key ID is located after sec rsa4096/
This will be useful, especially when you need to view the key ID (used in many of the commands).
See this reference for more information.
Migrate GPG Keypairs
To export the keypairs from your PC:
gpg --export <key-ID> > public_keys.pgp
gpg --export-secret-keys <key-ID> > private_keys.pgp
To import the keypairs to your other PC:
gpg --import < public_keys.pgp
gpg --import < private_keys.pgp
See this reference for more information.
Delete GPG Keypairs
To delete the keypairs from your PC:
You must delete the private key before you can delete the public key.
gpg --delete-secret-key <key-ID>
gpg --delete-key <key-ID>
Or delete the .gnupg file. On Windows machines, it should be at %USERPROFILE%/.gnupg.
See this reference for more information.
Password Entry on Mac
If you're on MacOS, under the default configuration, gpg might not be able to create a password prompt for you. Run the following commands
in sequence to install pinetry-mac, which is a small collection of dialog programs that allow GnuPG to read passphrases and PIN numbers
in a secure manner.
brew install pinentry-mac
echo "pinentry-program $(which pinentry-mac)" >> ~/.gnupg/gpg-agent.conf
killall gpg-agent