Overview
This section outlines the standard operating procedure for creating a new software release using the GitFlow workflow.
This version incorporates GitHub Pull Requests (PRs) for merging the release into main and back into develop, leveraging GitHub's review, CI checks,
and controlled merge capabilities.
Following these steps ensures consistency, allows for final review, and properly integrates release changes back into the main development line.
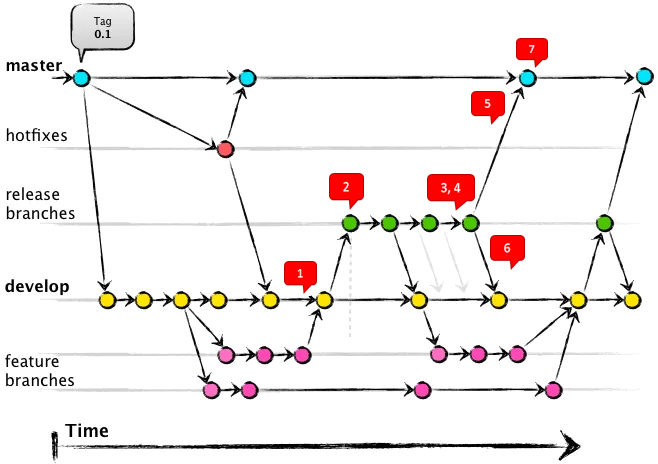
The following figure depicts the GitFlow:
Prerequisites
Before starting the release process, ensure the following:
- You have Git installed and configured locally.
- You have appropriate permissions in the GitHub repository (
origin) to create branches, push branches, create pull requests, and potentially merge pull requests (any team members other than the PR creator will have the merge permissions). - Our standard branches
main(for production releases) anddevelop(for ongoing integration) exist and are reasonably up-to-date locally. - The
developbranch contains all features and commits intended for this specific release. - The version number (VERSION) for the new release has been decided (e.g.,
v1.2.0). We are using Semantic Versioning (vX.Y.Z) for individual services and/or packages and libraries. - The release branch name (BRANCH_NAME) has been decided. The release branch name will this format YYYYMMDD/rc where
YYYYMMDDis the current date that the release branch is to be created. (e.g., 20250415/rc) - The name (COMPONENT_NAME) of the component(s) to be release has been decided (e.g.,
gis-web).
The steps highlighted can be used to release single or multiple components within same modules (same repository).
If multiple components are to be release, the step 7 will need to be repeated for each component.
Each component can have different version number.
The release tag to be used in step 8 should use this format COMPONENT_NAME/VERSION (e.g., gis-web/v1.2.0)
Release Steps
Remember to replace the BRANCH_NAME (e.g., 20250415/rc), VERSION (e.g., v1.2.0), and COMPONENT_NAME (e.g., gis-web) placeholders in the commands and
descriptions below with your actual target release branch name, version number, and component name.
Step 1: Ensure develop is Ready and Up-to-Date
Verify that your local develop branch includes all intended features and is synchronized with the remote repository.
# Switch to the develop branch
git checkout develop

# Pull the latest changes from the remote develop branch
git pull origin develop
Step 2: Create the Release Branch
Create the release branch from the current state of develop.
# Create the release branch from develop and switch to it
# Example: git checkout -b 20250514/rc develop
git checkout -b BRANCH_NAME develop
Step 3: Prepare the Release on the release Branch
Finalize the release on this branch. Only release-specific changes should be made here – no new features.
- Tasks:
- Perform final testing.
- Fix bugs for this release.
- Update
CHANGELOG.md - Update version number (pom.xml, package.json, etc.).
Update CHANGELOG.md by running changeset version in release branch.
See this (https://github.com/changesets/changesets) for more information.
npx changeset version
Commit changes to release branch:
# --- Make necessary changes ---

# Stage the changes
git add .

# Commit the changes with descriptive messages
# Example: git commit -m "chore: Bump version to 1.2.0"
# Example: git commit -m "chore: Update CHANGELOG for v1.2.0"
# Example: git commit -m "fix: critical release bug #XYZ"
git commit -m "chore: Bump version to VERSION"
Step 4: Push the Release Branch to GitHub
Push the release branch to origin. This makes it available for creating Pull Requests.
# Push the new release branch to origin and set upstream tracking
# Example: git push -u origin 20250415/rc
git push -u origin BRANCH_NAME
If further fixes are needed, commit them locally and push to origin/BRANCH_NAME again before proceeding.
Step 5: Finish Release - PR into main, Merge, Tag
Next, you need to create a Pull Request to merge release branch into main.
- Create Pull Request to main:
- Go to your repository on GitHub.
- Navigate to the
Pull requeststab and clickNew pull request. - Set the base branch to
main. - Set the compare branch to
BRANCH_NAME(e.g., 20250415/rc). - Review the changes and click "Create pull request". Fill in title and description.
In most cases, you will notice merge conflicts in the PR. Rather than manually fixing the merge conflicts one at the time, you can perform the followings simplest and fastest way to resolve the conflicts:
- Check out your
releasebranch locally. - Update it (git pull).
- Fetch
main(git fetch origin main). - Merge
mainintoreleaseusinggit merge origin/main -X ours - Push the updated
releasebranchgit push origin BRANCH_NAME(e.g., git push origin 20250415/rc) - Merge the now conflict-free PR on GitHub.
- Review and Approve PR:
- Team member review the code changes.
- Ensure all required status checks (CI builds, tests) pass on the PR.
- Merge the Pull Request into
main:- If everything is in place, team member whom review the PR will approve and merges the PR using the GitHub UI.
Ensure the merge method selected is Create a merge commit.
Do NOT use Squash and merge or Rebase and merge for merging release branches into main, as this deviates from the standard GitFlow history model.
Step 6: Finish Release - PR back into develop
Use a Pull Request to merge the release preparations back into develop.
-
Create Pull Request to
develop:- Go to your repository on GitHub.
- Click
New pull request. - Set the base branch to
develop. - Set the compare branch to
BRANCH_NAME(e.g., 20250415/rc). - Review the changes (primarily version bumps and fixes made during release prep) and click "Create pull request".
-
Review and Approve PR:
- Team members review the changes.
- Ensure CI checks pass.
- Obtain approvals if required.
-
Merge the Pull Request into develop:
- Team member whom review the chances merges the PR using the GitHub UI.
Use "Create a merge commit" here as well for consistency with GitFlow principles. Avoid squash/rebase.
- (Optional) Update local develop:
# Switch to the develop branch locally
git checkout develop

# Pull the latest changes, including the merge commit from GitHub
git pull origin develop
Step 7: Create GitHub Release (UI Step)
This step will be repeated for each component to be released.
- Navigate to the repository homepage on GitHub.
- Click the "Releases" link.
- Click "Draft a new release".
- In the "Choose a tag" dropdown, enter the
COMPONENT_NAME/Versionfor the component to release (e.g., gis-web/v1.2.0). Click on+Create new tag ... on publish. - In the "target" dropdown, make sure
mainis selected. - Enter a "Release title" (e.g., gis-web:v1.2.0).
- Write detailed release notes.
- (Optional) Attach build artifacts. If your component has API docs, they should be attached.
- Click "Publish release".