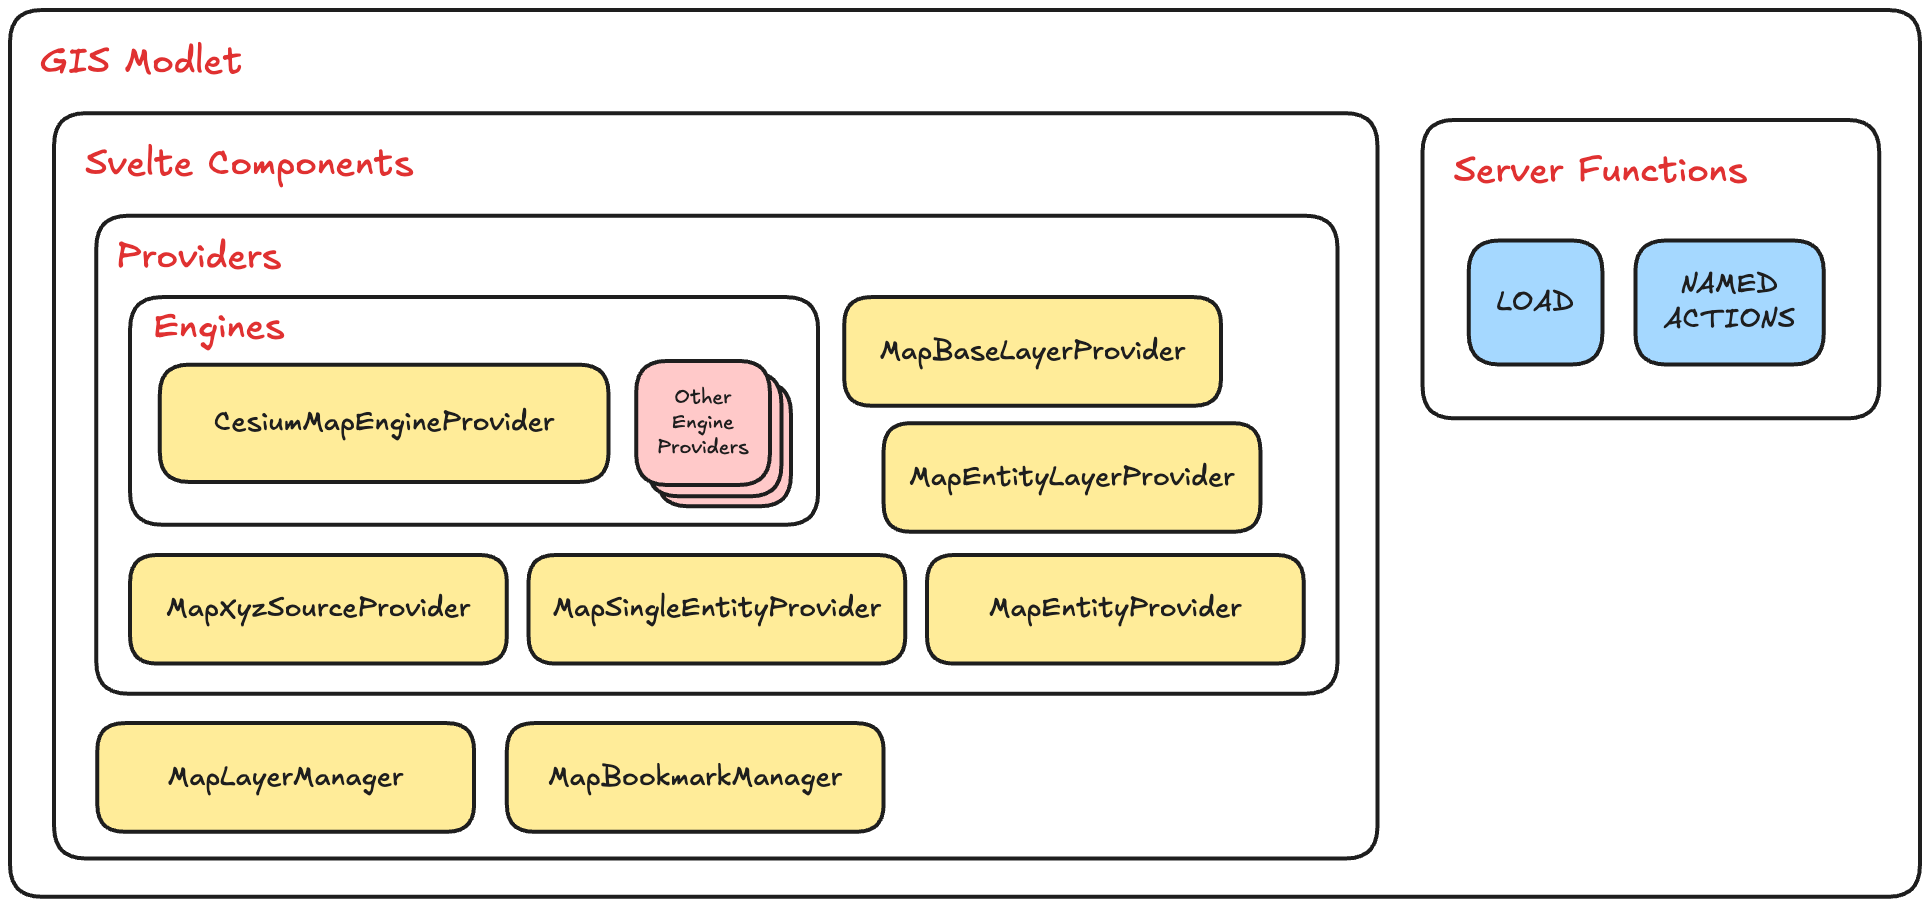
Modlet
The GIS modlet is designed such that map rendering engines can be swapped without having to change the usage of
the web components. This is achieved by having web components that interfact with the rendering engine through a
standardized interface.
Types
The GIS modlet exports its types under the Gis namespace, you can find this file in src/lib/aoh/gis/types.d.ts.
When referring to types in this documentation, you will often see the them prefixed with the "Gis" namespace, for
example, Gis.GeoEntityType - this refers to types that can be found in the file mentioned above.
Components
Under the src/lib/aoh/gis/components folder, you'll find these ready-to-use Svelte components.
Other components you find here that are not mentioned in these documentation are either still in-development and not ready for use, or meant for internal use only, you may however use them at your own risk.
MapCesiumMapEngineProviderMapBaseLayerProviderMapXyzSourceProviderMapEntityLayerProviderMapEntityProviderMapLayerManagerMapBookmarkManager
Map Component
The Map component is the heart of the GIS modlet, it contains all the glue to tie the Map components to the
rendering engine. The map must always be wrapped with an engine provider. At present, we only have one engine provider
(CesiumMapEngineProvider).
A bindable Gis.GisMap object is exposed if you need to get a reference to the map if necessary, but we recommend you
create more Svelte Components that get the Gis.GisMap from the Svelte context instead if you want to write reusable
components that could be contributed to the GIS modlet in the future.
<script lang="ts">
    import Map from "$lib/aoh/gis/components/Map/index.svelte";
    import CesiumMapEngineProvider from "$lib/aoh/gis/components/engines/CesiumMapEngineProvider/index.svelte";

    let map: Gis.GisMap;

    ...
</script>

<CesiumMapEngineProvider>
    <Map bind:map {...} >
        ...
    </Map>
</CesiumMapEngineProvider>
Example
<Map
    initial_camera_view={{
        position: [103.8189, 1.3521] // position of Singapore
        zoom: 8 // see `Gis.ZoomLevel` for more information
    }}
    rtus_seh_url={"http://rtus-seh.example.com"}
    rtus_map_name={"gis"}
    user_id={data.user?.sub}
    tenant_id={data.user?.active_tenant?.tenant_id}
>
    ...
</Map>
initial_camera_view
This property expects a Gis.CameraView, which contains all the necessary information to position and point a camera
in the map.
rtus_seh_url
The URL to the RTUS - SEH service - this for the SSE connection that will continually update the map with entities.
rtus_map_name
The name of the RTUS map that stores all the GIS state: this is the same map name as what you have declared in the
GIS service.
See gis.rtus.map_name and PUBLIC_GIS_RTUS_MAP_NAME
user_id
Currently not actually used for any purpose but checked during map initialization for legacy reasons. Must not be a falsy value for the map to be initialized. Just pass in any truthy value to proceed.
tenant_id
The tenant_id of the RTUS map to subscribe to - you should be using the tenant_id of the user for this property.
CesiumMapEngineProvider Component
The implementation of the interface can be found within the src/lib/aoh/gis/components/engines folder. We currently
support the CesiumJS render.
MapBaseLayerProvider Component
The MapBaseLayerProvider provides the map with base layers. This component expects one or more base layer sources to
be provided as children. See MapXyzSourceProvider.
Examples:
<MapBaseLayerProvider layer_name="Street" is_visible={true} options={{ brightness: 0.5 }}>
	<MapXyzSourceProvider url={`https://tile.openstreetmap.org/{z}/{x}/{y}.png`}></MapXyzSourceProvider>
</MapBaseLayerProvider>
You can group multiple sources under one layer to control their visiblity together. These sources will all appear as
just one layer in the Layer Manager UI. The order that they appear will be based on the order they are instantiated
in code here.
<MapBaseLayerProvider layer_name="Street" is_visible={true} options={{ brightness: 0.5 }}>
	<MapXyzSourceProvider
		url={`https://api.maptiler.com/tiles/hillshade/{z}/{x}/{y}.webp?key=0123456789`}
	></MapXyzSourceProvider>
	<MapXyzSourceProvider url={`https://tile.openstreetmap.org/{z}/{x}/{y}.png`}></MapXyzSourceProvider>
</MapBaseLayerProvider>
layer_name
The name of the layer, this is used by the MapLayerManager as a label for toggling the visibility.
is_visible
A boolean true or false value to determine if the layer is visible by default.
brightness
A brightness modifier to darken the layer. This is particularly useful for controlling translucent layers or to make certain layers stand out.
This property is scopes under an options object:
MapXyzSourceProvider Component
The MapXyzSourceProvider allows you to add an XYZ source URL that serves map tiles in the XYZ (a.k.a
Slippy Map Tilenames) format.
url
The tile source URL to connect to. The varies based on different flavours of servers, but a sample that uses an API key for authentication would look like this:
https://maptiles.p.rapidapi.com/local/osm/v1/zoom/x/y.png?rapidapi-key=YOUR-KEY
MapEntityLayerProvider Component
The MapEntityLayerProvider represents a layer that may contain one or more entity (and entity kinds). You need
to also pass in a MapEntityProvider as a child snippet to provide the necessary information for
to render entities in this layer.
Examples:
<MapEntityLayerProvider layer_name="Aircraft" is_visible>
	<MapEntityProvider kind={"aircraft"}>...</MapEntityProvider>
</MapEntityLayerProvider>
layer_name
The name of the layer, this is used by the MapLayerManager as a label for toggling the visibility.
is_visible
A boolean true or false value to determine if the layer is visible by default.
MapEntityProvider Component
The MapEntityProvider requires a snippet to be supplied for a chosen "kind".
In the following example, for all geoentities of kind "example", a floating, red <div> that shows the value of
example_property gets rendered. You can supply any snippet you want, and you can reference the geoentity's properties
via the snippet's parameters. The snippet will get rendered at the position
of the entity.geojson.geometry.coordinates (this is for Point features).
<MapEntityLayerProvider layer_name="Example Layer">
    <MapEntityProvider kind={"example"}>
        {#snippet children(entity: Gis.MapEntity<{example_property: string}>)}
            {#if entity.geojson.type === "Feature"}
                <div class="p-4 bg-red-500">{entity.geojson.properties.example_property}</div>
            {/if}
        {/snippet}
    </MapEntityProvider>
</MapEntityLayerProvider>
For lines, polygons etc. (shapes more complex than points) "geom" information needs to be specified for the renderer.
<MapEntityLayerProvider layer_name="Airport">
	<MapEntityProvider
		kind={"airport"}
		geom_style={{
			fill: "#999999",
			"fill-opacity": 0.5,
			stroke: "#FF0000",
			"stroke-opacity": 1,
		}}
		on_geom_click={(map_entity: Gis.MapEntity<Record<string, unknown>>) => {
			if (!map_entity.set_entity_style) {
				return;
			}

			map_entity.set_entity_style({
				fill: `rgb(${Math.floor(Math.random() * 255)} ${Math.floor(Math.random() * 255)} ${Math.floor(
					Math.random() * 255
				)})`,
				"fill-opacity": 0.5,
				stroke: "#FF0000",
				"stroke-opacity": 1,
			});
		}}
		on_geom_hover={(map_entity: Gis.MapEntity<Record<string, unknown>>) => {
			if (!map_entity.set_entity_style) {
				return;
			}

			map_entity.set_entity_style({
				fill: `rgb(${Math.floor(Math.random() * 255)} ${Math.floor(Math.random() * 255)} ${Math.floor(
					Math.random() * 255
				)})`,
				"fill-opacity": 0.5,
				stroke: "#FF0000",
				"stroke-opacity": 1,
			});
		}}
	></MapEntityProvider>
</MapEntityLayerProvider>
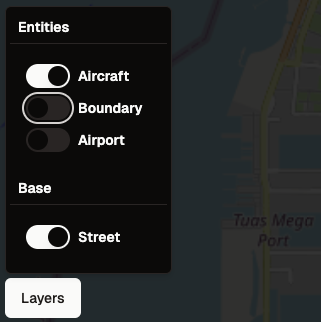
MapLayerManager Component
The MapLayerManager is a prebuilt UI component that adds map layer controls as a UI overlay.
It expects to be passed a child snippet which will be used as the button to open the manager. The following example
shows the child snippet with a <Button> component:
<MapLayerManager>
	<Button>Layers</Button>
</MapLayerManager>
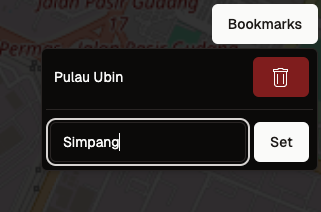
MapBookmarkManager Component
The MapBookmarkManager is a prebuilt UI component that adds controls to add and delete bookmarks.
It expects to be passed a child snippet which will be used as the button to open the manager. It also expects an array
of Gis.MapBookmarks to render on initialization.
The following example shows the child snippet with a <Button> component:
<MapBookmarkManager {bookmarks}>
    <Button>Bookmarks</Button>
</MapBookmarkManager>
MapControlPanel Component
The MapControlpanel provides a UI with a row of commonly used map functions, such as:
- Zoom in
- Zoom out
- Layer Filter/Selection
- Pointer tool
- Polyline/Polygon drawing tool
- Ellipse and Rectangle drawing tool
- Geometry border style selector
- Geometry border width
- Geometry border colour swatch
- Geometry fill colour swatch
You can use this component as reference for your own implementations, or use it as-is.
Map Functions
To access functions to control map behaviour, you can use the bindable Gis.GisMap object from the Map component.
You can then access the following functions:
Drawing modes are available via the set_mode_* functions - the functions put the map into different sub states that
have specific predefined behaviour to allow you to easily draw geometries (e.g. going into pointer mode changes the
click behaviour such that you can click on annotations to select them, or double-click on geometries to edit them):

set_mode_view
Call this function to put the map in view mode, which does not allow you to select annotations.
map.engine.set_mode_view();
set_mode_pointer
Call this function to put the map in pointer mode, which allows you to select annotations on single click, or
go into edit mode on double-click.
map.engine.set_mode_pointer();
set_mode_draw_polyline
Call this function to put the map in line drawing mode, which allows you to draw lines - you can connect the end
points of lines to form a polygon - which can have a fill colour.
map.engine.set_mode_draw_polyline();
set_mode_draw_rectangle
Call this function to put the map in rectangle drawing mode, which allows you to draw rectangles. You can hold shift
down to keep the aspect ratio 1:1 (square) as you drag out your rectangle.
map.engine.set_mode_draw_rectangle();
set_mode_draw_ellipse
Call this function to put the map in ellipse drawing mode, which allows you to draw ellipses. You can hold shift
down to keep the aspect ratio 1:1 (circle) as you drag our your ellipse.
map.engine.set_mode_draw_ellipse();
set_mode_edit_geometry
Call this function to edit a desired geometry by it's id. The list of geometries are available in a dictionary of
GeoJSON features within map.draft_features. The keys are the id, and the values are the features.
// Note this 'value' is the key, not the feature
const example_feature_id = map.draft_features.keys().next().value;
map.engine.set_mode_edit_geometry(example_feature_id);
set_mode_select_geometry
Call this function to select a desired geometry by it's id. The list of geometries are available in a dictionary of
GeoJSON features within map.draft_features. The keys are the id, and the values are the features.
// Note this 'value' is the key, not the feature
const example_feature_id = map.draft_features.keys().next().value;
map.engine.set_mode_select_geometry(example_feature_id);
The following functions (annotate_point, annotate_polyline, and annotate_polygon) can be passed an options
object, which can contain:
id: A unique string to represent the geometrygeom_style: AGis.GeomStyleto use to style the geometryz_index: A number to control the layer order of the geometry
annotate_point
Call this this function to add a point annotation to the map - you must specify coordinates in the form of a 2-element array, containing longitude and latitude in WGS84 degrees respectively.
Note: This does not add the annotation to the map.engine.draft_features, the draft_features
const coordinates = [-9.3515381, 53.8371663];
map.engine.annotate_point(coordinates, options);
annotate_polyline
Call this function to add a polyline annotation to the map - you must specify coordinates in the form of a 2D array,
similar to the GeoJSON LineString format.
const coordinates = [
	[-9.351092, 53.838159],
	[-9.351789, 53.837571],
	[-9.351004, 53.837645],
	[-9.351756, 53.837003],
];
map.engine.annotate_polyline(coordinates, options);
annotate_polygon
Call this function to add a polygon annotation to the map - you must specify coordinates in the form of a 2D array,
similar to the GeoJSON LineString format, except the final coordinate is expected to be the same as the first, meaning
it is like a GeoJSON Polygon geometry with one less dimension (the GeoJSON format has an extra dimension to allow the
definition one of more polygon to represent a hole in it).
const coordinates = [
	[-9.35154, 53.838099],
	[-9.351335, 53.838104],
	[-9.351304, 53.838014],
	[-9.351041, 53.837952],
	[-9.351005, 53.837844],
	[-9.350895, 53.837688],
	[-9.350977, 53.837502],
	[-9.35154, 53.836949],
	[-9.351833, 53.83692],
	[-9.351949, 53.837589],
	[-9.351854, 53.837728],
	[-9.351665, 53.837883],
	[-9.35154, 53.838099],
];

map.engine.annotate_polygon(coordinates, options);
delete_point_annotation
Delete a point annotation by it's id.
map.engine.delete_point_annotation("example_id");
delete_polyline_annotation
Delete a polyline annotation by it's id.
map.engine.delete_polyline_annotation("example_id");
delete_polygon_annotation
Delete a polygon annotation by it's id.
map.engine.delete_polygon_annotation("example_id");
set_camera_behaviour
This function allows you to control the camera's behaviour - particulary, if it is allowed to pan, rotate or zoom. This is particularly useful if you are creating features that require dragging (which overlaps with the panning).
const options = {
	panEnabled: false,
	zoomEnabled: false,
	rotateEnabled: false,
};

map.engine.set_camera_behaviour(options);
get_camera_direction
This function lets you retrieve the direction of the camera.
const direction = map.engine.get_camera_direction();

console.log(direction); // [ 1.32472, 0.2432, 2.512 ]
See Direction for more information.
get_camera_zoom
This function lets you retrieve the zoom of the camera.
const zoom = map.engine.get_camera_zoom();

console.log(zoom); // 14
See Zoom for more information.
fly_to
This function performs a camera fly (pan) to a location - the exact behaviour will depend on engine implementations, so the option allowed for CesiumJS is only duration but other engine implementations might allow for more options such as an easing functions or more.
Pass a camera view in for the engine to know the final desired state of the camera after flying.
const cam_view = {
	zoom: 12,
	position: [-9.351538, 53.837166],
};

map.engine.fly_to(cam_view, { duration: 0.5 });
coordinates_to_screen
This function is useful when you need to retrieve the screen (X and Y) coordinates based on the longitude and latitude, for example, if you need to create a popup at a specific area on the screen, or perform other calculations.
map.engine.coordinates_to_screen([-9.351538, 53.837166]);
The following are callback functions that are called when the events occur, you can subscribe to the events by assigning a callback function to them - this function will be called when the specific event occurs.
on_geometry_saved
Called whenever a geometry is created, or updated (saved).
map.event_subscriptions.on_geometry_saved = (geometry) => {
	logger.info({ geometry }, "You saved a geometry!");
};
on_geometry_selected
Called whenever a geometry is selected (either in pointer mode or programmatically).
map.event_subscriptions.on_geometry_selected = (geometry) => {
	logger.info({ geometry }, "You selected a geometry!");
};
on_geometry_deleted
Called whenever a geometry is deleted (either via the UI or when deleted programmatically).
map.event_subscriptions.on_geometry_deleted = (geometry) => {
	logger.info({ geometry }, "You deleted a geometry!");
};
Example Page
A full example page, complete with server functions in use is installed by default as an example at:
src/routes/(private)/aoh/gis/+page.server.tssrc/routes/(private)/aoh/gis/+page.svelte